
Elevating Kitchen Design: Making the Most of Unused Spaces
How we transformed an unused nook under the stairs into a functional and vibrant family area.
Designing spaces is something I truly enjoy, especially knowing I've utilized every possible corner for my clients. Today, even a few extra square feet can translate into tens of thousands of dollars in value...
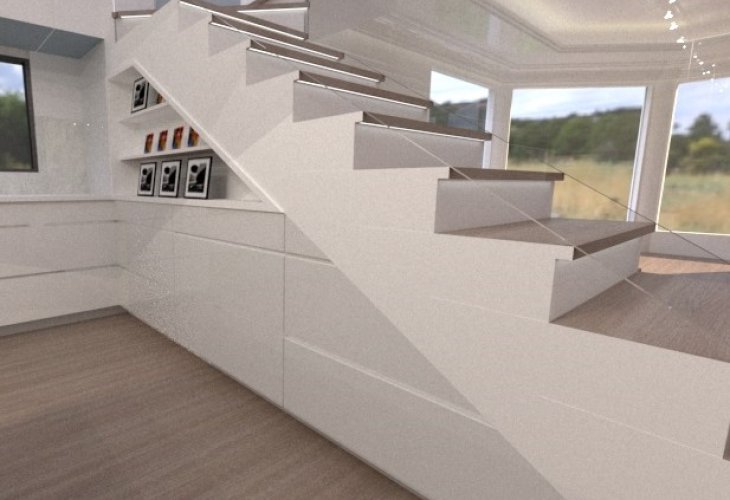
Our kitchen was adjacent to a staircase, creating a corner that initially seemed pointless.
What did we do with it? Under the stairs, up to a height of about 79 inches, we added deep, large drawers for storing Passover items. The advantage? During the year, these drawers remain closed, keeping the area clean and maximizing storage space since everything comes out at once. The drawers ensure we don't have to reach far back to grab things.
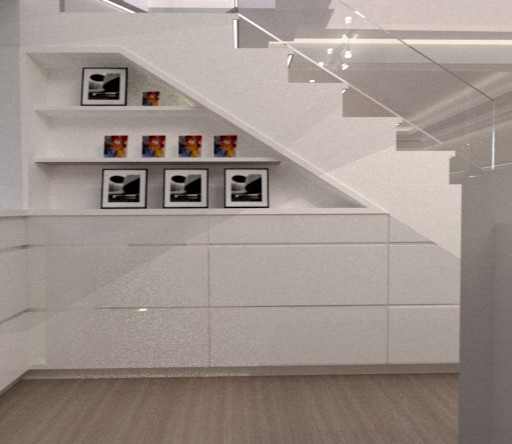
Additionally, our client wanted a corner to display family photos in the kitchen. The best place was under the stairs. However, with a depth of about 35 inches and photos needing only 8 inches, it seemed wasteful to use all that space just for pictures.
Our solution was to combine storage. We built a Passover cabinet, opened once a year, and split the drawers. The lower drawers utilized the full depth of 35 inches, while the upper drawers were 28 inches deep, cleverly hidden behind a door with 8-inch wide photo shelves. We added folding shelves to open the door fully.
This way, we turned a "dead" space into a lively, family-centric area that upgraded the kitchen atmosphere and gained a lot of storage.
Storage for Kitchen Appliances
In modern minimalist design, everything needs its place, including hiding useful appliances like water coolers and microwaves. Even mixers deserve a hidden spot for easy access.
How did we elegantly hide them? By creating a framework with the upper cabinets, we formed two hidden corners next to the counter. In one, we placed the water cooler; in the other, the mixer, food processor, and toaster.
Instead of the typical roll-up shutters, we used HK lift systems, maintaining a sleek and unified kitchen look. We extended the counter to the end of the cabinet, making it easy to slide out appliances, and we pre-planned the necessary outlets.
Materials
We laminated the drawers with a polymer, a plastic-based material. This allows door fronts to have a consistent look (unlike laminate where edges differ).
Another key point: we chose polymer to have integrated handles made from the same material (something only possible with polymer or baked paint finishes, but not with laminate where integrated handles must combine materials like aluminum). This resulted in a clean, uniform look for the doors and drawers, with almost invisible handles.
Tammy Rotenberg is an architect and interior designer. For questions and feedback: TammyRotenberg@Gmail.com
